The how (and why) of maintenance part 4
As one can understand, valve maintenance in not as easy as many tend to believes, it is not as claimed by some; just inject some diesel or kerosene, if that does not work replace the valve with a new valve.
In the last 3 years I have performed valve maintenance on quite a lot of valves in onshore plant or offshore installations. On all the ball valves I have been working on, this goes from 3” and up to 42”, only 10% of the valves was mechanically damaged and beyond inline repair, or the valves were not equipped with sufficient lubrication fittings to perform maintenance on them. As an example: I was involved with a 38” class 900 split body valve with only on lubrication fitting to each seat, placed diagonally opposite each other. How much valve cleaner do you think must be used if one should inject sufficient amount to cover the hole 2.8 meter of the circle of the seat from one fitting on one side? And the answer is: Too much, it is impossible to perforce a proper maintenance on that valve. Of the remaining 90 % of the valves, we were able to make the valves work and seal. These were valves that were on the list for replacement.
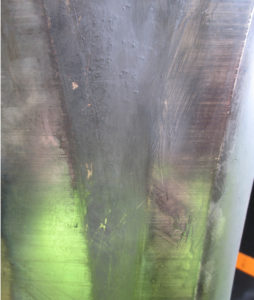
Figure 16
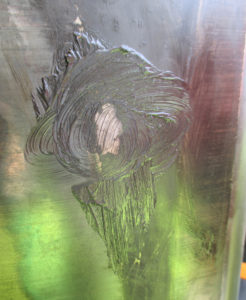
Figure 17
To illustrate how important it is to use a semi-liquid valve cleaner I will use two pictures from a 36” valve on export gas service. Fig. 16 shows the thin layer of hardened hydrocarbons on the ball witch prevents the seat to preform a good seal. In fig. 17 I have applied some semi liquid valve cleaner, left it on for 15 minutes and gently rubbed in the centre. As one can see, the steel of the ball is now shining and the deposits are dissolved. If not getting enough solvent to cover the whole circle of seal contact, the result will not satisfactorily.
To get the best result when cleaning the valve it is an advantage to maintain the valve in a pressurized situation. You can use the differential pressure and the leak path on the seats/ ball to your advantage, to lead the dissolve around the sediments/ deposits and dissolve them. I won’t tell you all my secrets here; then they would not be secret any more.
After cleaning the valve, if there are a major leak that must be treated with sealant component it is important to inject the proper amount and on the right seat. Fig. 18 witch is a 36” class 900 valve with only 6 canals, illustrates how much sealing component needed to seal from one seat canal to the next. This is the seat canal covered in part 2 illustrated in fig. 8. This photo was taken on the up-stream side of the valve after the job was done, but before the valve was operated. One can see where the jet stream has past the seat when the up stream side was depressurised.

Figure 18
When using sealant component to seal a valve it is impotent to have control with the leak rate into the valve cavity. As stated in part 3 of this series there are two ways of doing maintenance: You can try and hope for the best (wonders rarely happens), or analyse and do everything under control, and now we come to the tricky part; How to be in control?
The answer is: Cavity control with an auxiliary valve in the cavity. That valve can be like the one in fig 19, witch is a standard ball valve where one must install a T-piece with a gauge and an extra valve on the outside of the gauge, or one can use a special made auxiliary valve with a test port for installation of the gauge, illustrated in fig. 20.
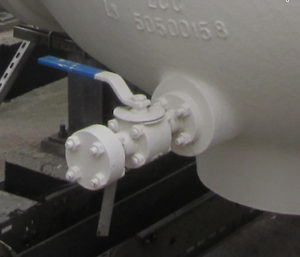
Figure 19
When starting with a leaky valve, before cleaning, one should test the leak rate into the cavity. With a fully pressurized system the leak into the cavity can be from both seats or from one, which you don’t know. After cleaning the valve, once again, test the valve. Now you can compare with the first test if you got any result from the cleaning. There can be three results from this comparison:
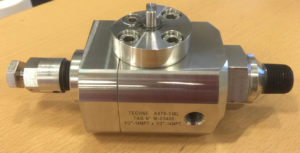
Figure 20
1: No improvement, same as before the cleaning.
The reason for this can be a mechanical failure in the valve due to erosion, cavitation, aspirated soft seals on the seat or seat rings locked in the seat pocket. In this case analyse the use of the valve, medium, soft or metal sealed seats – – – –
2: Reduced leak rate after the cleaning.
Seats may have loosened, deposits dissolved and the seats are forming a better seal towards the ball.
3: Increased leak rate after the cleaning.
If the seats and ball are full of scratches that was filled with deposits and partly creating a seal, that seal are now reduced due to dissolving the deposits in the scratches.
Remember that both seats are tested as upstream seats, when reducing the down stream pressure you may obtain a much better seal, infect you may have a valve that seals completely in that direction, but leaks in the other direction.
Now it depends on the purpose of the valve. If the valve is an ESD valve you are not allowed to use sealing component to reach the valves leak rate, but if the valve is a block valve to be used for isolation purpose to perform a job, sealing component may be used to seal the valve to create isolation. If using sealing component you must never use any component that may dry out and block the canal and lock the seat in the seat pocket.
When using sealing component in ball valves, there are several factors to be considered. But first of all: On ball valves, only use sealing component on the up stream seat! You should NEVER use sealing component on the down stream seat. You could just as well pore it in the trashcan.
To be continued
Do you want to download this article as a PDF?
Click here to download